Jobs
- Philippe Mack
- Juliana Fonseca Paim
- Joanna Huddleston
Jobs
Jobs in DATAmaestro Lake execute an action at a given frequency. The following types of jobs are available at DATAmaestro Lake.
Job | Description |
|---|---|
Computed tag | Calculate functions based on other tags within the Lake |
Delayed tag | Delay tag in time |
Export to Analytics | Create a reoccurring export of data from the Lake to an Analytics project. |
Imported Model (Alpha) | Static model in json, exported from an Analytics project. In this case, if the model changes in Analitics project, this exported model doesn't change. Not recommended. |
Model Predict | Calculate the real-time outputs of a predictive model directly linked to an Analytics task |
Moving Average Tag | Calculate the real-time outputs of a predictive model directly linked to an Analytics task |
Script | Multipurpose scripting tag options (Advanced) |
Synchonizer | Synchronize multiple DATAmaestro Lakes. |
Tag Replay | Replay or loop data in the Lake (for the purposes of training or demos) |
E-mail alert | Send email alerts based on predefined rules (email server must be available) |
| Batch Feature | Calculate features per batch ("fingerprinting") |
| Batch Structure | Create Batch Structure from time-series data |
From the jobs page, all jobs can be created, edited or deleted. There is also information on a job’s status: executing (indicates job is currently running), pending (waiting for next execution) or error (an error message will be provided).
Create Jobs
From this menu, create jobs for computed tags or exports to DATAmaestro analytics.
Click Manage > Jobs in the menu.
Click + New job button on top right.
Choose a New Job Type.
Click Create.
On General tab:
Enter Job id: /folder/Job Name. Example: /demo/Automotive/Computed Tag/PercentageValue.
Select Scheduling.
Standard: Job will be executed a first time after the initial delay and then execution will occur at regular intervals. This regular interval is defined by the period.
Every day: Job will be executed every day at the same time.
- Enter a Time zone, by default UTC.
- You can schedule job at multiple fixed times per day. Therefore in At times enter time (houras and minutes and clink on + to add another time. Click on the trash icon to remove.
Enter Initial delay, if the initial delay is equal to zero the job starts as soon as the Save button is clicked.
Put Period, time interval between each job execution. Important remark: it is necessary to put the units, example, for a period of 10 minutes: 10m.
Letter
Description
d
day
h
hour
m
minute
s
second
Period for a Computed tag: The period does not influence the frequency or number of output values written by the Computed Tag job itself, only when the calculation will run. The frequency and number of output values written by the Computed Tag job depend on the input variable(s) frequency and number. For example, a job with a Period set to 24h will run every 24 hours. If the data uses input tags sampled every minute, then it will write values every minute. Each time the job runs, it looks to see the last output value and continues the calculation from that point. Therefore, if the job last ran 24 hours ago, it will write an output value every minute (for minute sampled data) for the last 24 hours. The resulting calculation does not depend on the period.
Put the Class name, this indicates the type of job:
Computed tags: be.pepite.pepito.data.historian.tm.jobs.ComputedTagTask
Exports to Analytics: be.pepite.pepito.data.historian.tm.jobs.ExportToAnalyticsTask
On Properties tab (depend on the Job Type):
Create computed tags
A computed tag calculates functions based on other tags within the Lake.
Two steps to creating a computed tag in DATAmaestro Lake:
Create new tag “shell”.
Create a job to calculate values to fill new tag “shell”.
Introduction to Lake Access rights:
All jobs within DATAmaestro Lake must be saved in a folder that has access to the data they will require to make their calculation.
If a job is created at “Cement Data…” it has access to all tags in the folder “Cement Data” AND any sub folders within Cement Data (i.e., Computed).
However, if a job is created at “Cement Data/Computed”, it ONLY has access to tags in the sub folder “Computed”.
Note: A forward slash “/” denotes the next level in the folder structure.
To create new computed tags:
This step creates a new empty tag within the DMlake, this is the first step required to create computed tags.
From this menu, create jobs for computed tags or exports to DATAmaestro analytics.
Click Manage > Jobs in the menu.
Click + New job button on top right.
Choose a New Job Type: ComputedTagTask
Click Create.
On General tab:
Enter Job id. Note: The job must be in a Folder that has access to the necessary data to be executed.
Click + New Folder
Select Base Folder. Choose the same Base folder as the tags used for the computed tag executing.
Enter New Folder name. Example: computed.
Create a New Folder to put all computed tags in the same folder.
Example of Job Id: /Site A/Line 1/computed/Delta (predict - real)
Select Scheduling.
Enter At time (hours) : (minutes)
Standard: Job will be executed a first time after the initial delay and then execution will occur at regular intervals. This regular interval is defined by the period.
Every day: Job will be executed every day at the same time.
If scheduling Standard, enter Initial delay, if the initial delay is equal to zero the job starts as soon as the Save button is clicked.
Put Period, time interval between each job execution. Important remark: it is necessary to put the units, example, for each 10 minutes : 10m. Period for a Computed tag: The period does not influence the frequency or number of output values written by the Computed Tag job itself, only when the calculation will run. The frequency and number of output values written by the Computed Tag job depend on the input variable(s) frequency and number. For example, a job with a Period set to 24h will run every 24 hours. If the data uses input tags sampled every minute, then it will write values every minute. Each time the job runs, it looks to see the last output value and continues the calculation from that point. Therefore, if the job last ran 24 hours ago, it will write an output value every minute (for minute sampled data) for the last 24 hours. The resulting calculation does not depend on the period.
Class name indicates the type of job. This field is automatically filled.
Computed tags: be.pepite.pepito.data.historian.tm.jobs.ComputedTagTask
Create a Computed Tags Directory
Before creating your computed tags create a Computed Folder. For more information, Create New Folder.
Letter | Description |
|---|---|
s | second |
m | minute |
h | hour |
d | day |

On Properties tab:
Before creating a computed tag, first you need to create a New Tag. The new tag created is empty of data and the calculation performed by the computed tag will fill this tag with data.
Click + New Tag button.
Enter Folder, path is automatically filled.
Enter tag Name.
Enter Title, if required.
Enter Type, Numeric or Symbolic.
Enter Unit, if required.
Enter Description, if required.
Click Save.
Select Computed Tag. Note: You can only select tags in the folder or subfolders of the job.
Select Input tags. Note: You can only select tags in the folder or subfolders of the job.
Compute latest value checkbox is checked by default. Lake allows the insertion of several values at a same timestamp. By default, the computed tag is not going to calculate a new value for the last input since it is not sure whether it is going to have another value at the same timestamp. Therefore the computed tag can have one late value. If Compute latest value equals to true it is possible to indicate to the computed tag that it can calculate the last input even if there is a new value at the same timestamp that can be inserted later.
Write the script. The script must be written in Javascript.
Click Save.
Click Truncate to remove data of the computed tags from a particular date onwards.
In the example below, the new computed tag Percentage of bad units simply transforms the variable Ratio of bad units into a percentage value by multiplying it by 100.

On Advanced properties tab:
In this tab it is possible to edit all the properties of the job in a JSON format. For computed tags the properties that can be edited are:
output tags
input tags
script function
Compute latest value = false

output tags
input tags
script function
Compute latest value = true (check the image below, still is Optimistic when true)

For advanced usage:
Apply tag validity
If for example, you would like to calculate a computed tag with data that is uploaded every minute, however, there is a laboratory measurement that is uploaded only once per day. In this case, you can decide to save this same value during 24 hours (tag validity = 24h). In Advanced properties write the script below. In this example, there is a 3 days validity. Warning: This option should only be used with highly rare data measurements. Please contact PEPITe support for more information.
Create delayed tags
From this menu, shifts a tag backwards or forward in time.
Click Manage > Jobs in the menu.
Click + New job button on top right.
Choose a New Job Type: DelayedTagTask.
Click Create.
On General tab (please check the general tab explannation in Create Job):
In Class name indicates the type of job. This field is automatically filled.
Delayed tags: be.pepite.pepito.data.historian.tm.jobs.DelayedTagTask
On Advanced properties tab:
- Write script. Note that the script must contain:
- The time shift in ms. Example: for 1h write 3600000. If positive or no signal the tag shifted forward (advanced of 1 hour). If negative the tag is shifted backwards ( delayed by 1 hour).
- Suffix. Example : _ delayed
- Input tags with path Name.
- Is Optimistic : true/false. (Compute latest value)
Export to Analytics
From this menu, create jobs to export data to DATAmaestro analytics.
- Click Manage > Jobs in the menu.
- Click + New job button on top right.
- Choose a New Job Type: ExportToAnalyticsTask.
- Click Create.
On General tab (please check the general tab explannation in Create Job):
In Class name indicates the type of job. This field is automatically filled.
Delayed tags: be.pepite.pepito.data.historian.tm.jobs.ExportToAnalyticsTask
On Properties tab:
- Select Tags. Note: You can only select tags in the folder or subfolders of the job.
- Enter Last period, export with a rolling window. For example, the last 72 hours. If defined, it remplaces Start date and End date, therefore they are not employable. Export data is defined as from now until Last period duration.
- Select Start date, set date followed by hour and minutes (Optional). Export data after Start date. Unused if Last period is defined.
- Select End date, set date followed by hour and minutes (Optional). Export all data between Start date and End date. If the End date is undefined, export all data after Start date. Unused if Last period is defined.
- Select Method. To have more details about the methods, please check Export to Analytics.
- Select Sampling period. It defines desired data sampling frequency, for example, a database which should have one value every hour should enter “1h” in this field.
Enter DMFF file name, example : nameDMFFfile_rawextract.dmff. Hint: Search the DMFF file name in Data sources of your DATAmaestro project.
- To enter a project first click on + Add project. In Project Id select the project (folder/project name.dom.project) by clicking on the folder button. As Task id select dmff-2 from the list. This information is placed at the end part of the url pathname of the DMFF file in the data sources. To remove the selected project click on the trash icon button. You can add more than one project for the projects’ list.
- Enter the DMFF file name, as example : name_rawextract.dmff.
DMFF file name
DMFF file name, Project id and Task Id are very important information for the job export, they allow the job to automatically update the project data source and, consequently, all tasks in DATAmaestro.
Warning
Note on DMFF file the will replace an existant DMFF both with the same name. This means that if the same file is used in two different Analytics projects (for example, if you create a copy of the project) and if the DMFF is updated in only one project, but both projects have the same file name, the DMFF file will be automatically updated in the other project too.
On Advanced tab:
In this tab it is possible to edit all the properties of the job in a JSON format. For export to DATAmaestro the properties that can be edited are:
- tags
- file name (DMFF)
- method
- last period
- project id
- task id
Explore Imported Model created in DATAmaestro Analytics project
From this menu, create an imported model created in Analytics and exported in JSON format.
- Click Manage > Jobs in the menu.
- Click + New job button on top right.
- Choose a New Job Type: ImportedModelTagTask
- Click Create.
On General tab (please check the general tab explannation in Create Job):
- Class name indicates the type of job. This field is automatically filled.
- Model ISHM: be.pepite.pepito.data.historian.tm.jobs.ImportedModelTagTask
On Properties tab:
- Enter Model Path.
- In the ISHM model page, click on More Actions.
- Click Export model to JSON.
- The .json file is automatically downloaded on your computer
- Open the Model Path folder in the ISHM Job in DATAmaestro Lake and click "Upload model file" and select the .json file from your computer.
- Enter Input tags (Optional). It is a list of tags used to fill model inputs. Use this field if the tag names are not the same as those used in the DATAmaestro project or the tag location needs to be specified. If left empty, the model will try to find input tags in the working folder which is a combination of Job Folder and Input Folder, the latter, if assigned.
- Enter Output tags (Optional). The list of tags as a result of the ISHM model. It can be an extensive list therefore it is advisable to let the ISHM Job create it in a specific folder.
- Select Start Time. The model results will be calculated from this point onwards.
Advanced
- Enter Input Folder. It is an optional, used to relativize input tags’ path. A relative path is a path which doesn’t start with the root element.
- Enter Output Folder. It is an optional, used to relativize output tags’ path. Hint: Enter the New Folder created in step 1 - General tab - example: /demo/Chemicals/computed_ISHM.
- Compute latest value checkbox. If it is equal to true it is possible to indicate to the computed tag that it can calculate the last input even if there is a new value at the same timestamp that can be inserted later.
On Advanced tab:
In this tab it is possible to edit all the properties of the job in a JSON format. For model tag task the properties that can be edited are:
- sample method
- model path
- input or output folder
- start time
DATAmaestro Lake: ISHM Job indicates unknown cluster conditions
ISHM indicates when it encounters an unknown set of operating conditions.
In the example below, the ISHM model was not trained on Chemical type = II. You can see that there is an indication of Unknown Condition(s): C - Chemical type = II.

Explore a Model Predict Job created in DATAmaestro Analytics project
From this menu, create a model predict job of a model created in Analytics.
- Click Manage > Jobs in the menu.
- Click + New job button on top right.
- Choose a New Job Type: ModelPredictTagTask
- Click Create.
On General tab (please check the general tab explannation in Create Job):
- Class name indicates the type of job. This field is automatically filled.
- Model predict tag: be.pepite.pepito.data.historian.tm.jobs.ModelPredictTagTask.
On Properties tab:
- Enter Project Id which is the path name of DATAmaestro Analytics project, example : /folder/ProjectName.dm.project.
- Enter Task Id, open the task in DATAmaestro, for example linear regression, the last part of the URL is the Task Id. Example: linear-regression-505.
- Input tags field only if Input Map is not used. When it is used, it disables the Input map. List of tags used to fill model inputs. Note that the sequence (order) of the tags is important. If left empty, the model will try to find input tags in the working folder. Working folder is a combination of Job Folder and Input Folder, the latter, only if assigned.
On Advanced tab:
- Output Map is the model output. If the model has more than one output ? If left empty, the model will try to find the output tag in the working folder. Working folder is a combination of a Job Folder and Output Folder, the latter, only if assigned.
- Enter Input Folder. It is an optional, used to relativize input tags’ path. A relative path is a path which doesn’t start with the root element.
- Enter Output Folder. It is an optional, used to relativize output tags’ path. Hint: Enter the New folder used in step 1 - General tab - example: /Site A/Line 1/computed_models
- Compute latest values checkbox. If it equals to true it is possible to indicate to the computed tag that it can calculate the last input even if there is a new value at the same timestamp that can be inserted later.
- Input tags field is used only if you don't want to use the Input map. When it is used, it disables the Input map. List of tags used to fill the model inputs. Note that the sequence (order) of the tags is important. If left empty, the model will try to find input tags in the working folder. Working folder is a combination of Job Folder and Input Folder, the latter, only if assigned.
- Output tags field is use only if you don't want to use the Output map. When it is used, it disables the Output map. List of tags that will contain model results (if more than one ouput). Note that the sequence (order) of the tags is important. If left empty, model will create output tags in the working folder. Working folder is a combination of Job Folder and Output Folder, the latter, only if assigned.
On Advanced tab:
In this tab it is possible to edit all the properties of the job in a JSON format. For model predict task the properties that can be edited are:
- sample method (definition) always snap?
- input tags’ map
- project id
- task id
Moving Average Tag
From this menu, create a simple moving average calculated by taking the average of a set of values over a defined period length. It is a technique used to smooth a curve, filter out the noise.
- Click Manage > Jobs in the menu.
- Click + New job button on top right.
- Choose a New Job Type: MovingAverageTagTask.
- Click Create.
On General tab (please check the general tab explannation in Create Job):
- Put the Class name, this indicates the type of job:
- Moving average: be.pepite.pepito.data.historian.tm.jobs.MovingAverageTagTask
On Properties tab:
- Select Input Tags. Note: You can only select tags in folders or subfolders of the job.
- Enter the time window From To specify the period length for the moving average calculation.
- Enter Prefix for the tag name, if required, e.g.: MovingAVG_XXX
- Enter Suffix for the tag name, e.g.: _AVG.
On Advanced:
- Enter Input Folder. It is an optional, used to relativize input tags’ path. A relative path is a path which doesn’t start with the root element.
- Enter Output Folder. Used to define output tags' path inside the job folder.. Hint: Enter the New Folder created in step 1 - General tab - example: /Site A/Line 1/computed_MovingAverage.
- Select Output Tags. It is Optional. Only useful if you don't want to use a prefix and / or suffix mechanism. Output tags will be defined following this list and won't be created based on Prefix and Suffix.
- Check Compute latest values checkbox.
In Advanced properties tab:
In this tab it is possible to edit all the properties of the job in a JSON format. For moving average tag task the properties that can be edited are:
- output tags
- from to
- input tags
Script
From this menu, create a script tag.
- Click Manage > Jobs in the menu.
- Click + New job button on top right.
- Choose a New Job Type: ScriptTagTask.
- Click Create.
On General tab (please check the general tab explannation in Create Job):
- Class name indicates the type of job. This field is automatically filled.
- Script tags: be.pepite.pepito.data.historian.tm.jobs.ScriptTagTask
On Properties tab:
- Select language. Options: R, javascript or Python.
- Write the script in the page editor.
On Advanced properties tab:
In this tab it is possible to edit all the properties of the job in a JSON format.
Note: Examples of script tags will be added soon.
Synchronizer
From this menu, copy tags from a remote Lake.
- Click Manage > Jobs in the menu.
- Click + New job button on top right.
- Choose a New Job Type: SynchronizerTask.
- Click Create.
On General tab (please check the general tab explannation in Create Job):
- Class name indicates the type of job. This field is automatically filled.
Synchronizer Task: be.pepite.pepito.data.historian.tm.jobs.SynchronizerTask
On Advanced properties tab:
- Write script.
The script must contain:
- User and Password for the remote Lake
- Remote path, where the tags are located.
- Recurse option = true/false.
- Server URL location.
- Activate or deactivate the synchronization with parameter Disabled. If true synchronization is deactivated.
Tag Replay
From this menu, it is possible to repeat the tags in another period of time.
- Click Manage > Jobs in the menu.
- Click + New job button on top right.
- Choose a New Job Type: TagReplayTask.
- Click Create.
On General tab (please check the general tab explannation in Create Job):
- Put the Class name, this indicates the type of job:
- Replay tags: be.pepite.pepito.data.historian.tm.jobs.TagReplayTask
On Advanced properties tab:
- Write the script.
{

  "endDate": "2005-08-19T10:00:00Z",  // original end date

  "replayDate": "2018-11-01T00:00:00Z",  // start date used to replay date

  "startDate": "2005-08-18T13:00:00Z"  // original start date

}
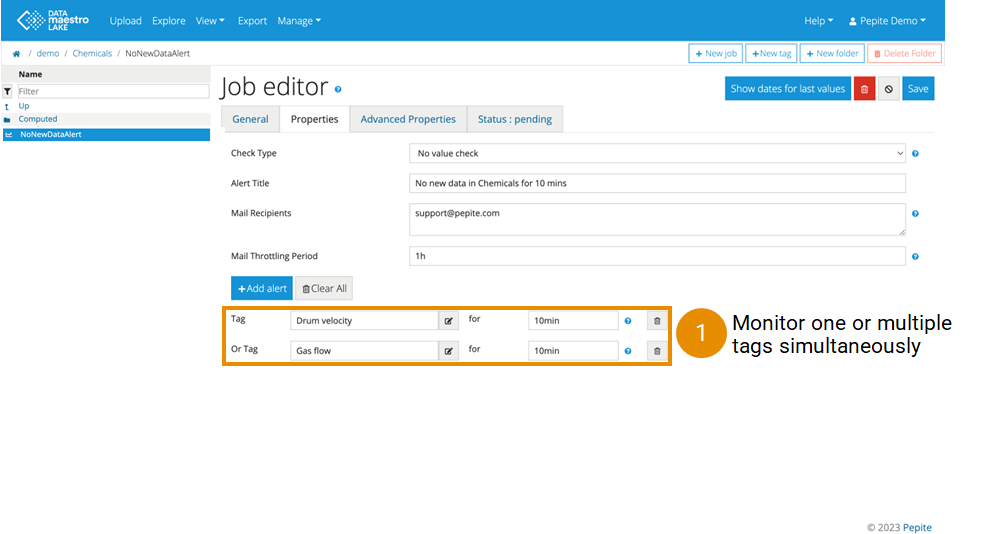
Mail Alert
From this menu, send an email alert based on a condition.
- Click Manage > Jobs in the menu.
- Click + New job button on top right.
- Choose a New Job Type: MailAlertTagTask.
- Click Create.
On General tab (please check the general tab explannation in Create Job):
- Put the Class name, this indicates the type of job:
- Replay tags: be.pepite.pepito.data.historian.tm.jobs.MailAlertTagTask
On Properties tab:
- Enter Alert title, e.g. Gas Pressure Alert.
- Enter Alert Duration. It is the minimum duration for a threshold state to be active before an alert is sent. For example, the tag value must be above the threshold during 5 minutes before the alert is sent.
- Enter Deactivation Duration. It is the minimum duration for a threshold state to return to an acceptable range before an alert state is deactivated. For example, the tag value must return below the threshold during 1 minute before the alert state is deactivated.
- Enter Mail Recipients. Note: one email address per line.
- Enter Mail Throttling Period. It is the minimum time period between two alert emails. For example, send maximum 1 email per day.
- Click + Add Condition.
- Select tag(s). Note: you can only select tags in the folder or subfolders of the job.
- Select condition. E.g.: Tag Outside 850 1800, an email will be sent when the numerical tag is outside the range (850-1800). Tag Not Member of GOOD, if the symbolic tag is not equal to GOOD an email will be sent.
- Enter value(s). Note: Member of or Not Member of is the only condition that can be used for symbolic tags.
Batch Structure
From this menu, create Batch Structure from time-series data.
- Click Manage > Jobs in the menu.
- Click + New job button on top right.
- Choose a New Job Type: BatchStructureTagTask.
- Click Create.
Batch Structure
The Batch Structure is a prerequisite to calculate batch features using the Batch Features Jobs.
On General tab (please check the general tab explannation in Create Job):
- Put the Class name, this indicates the type of job:
- Replay tags: be.pepite.pepito.data.historian.tm.jobs.BatchStructureTagTask
On Properties tab:
- Enter an Input folder , select the folder in the Lake.
- Enter an Output folder this is Directory where output tags will be created,
- Chick the Start Time on the calendar, the job will search batches from that time.
- Enter a Dafault batch maximum duration. If there isn't any upper bound transition time rule for finding a batch structure step tag, the Default batch maximum duration will be used so that the search is not indefinite. An implicit time rule will be displayed. If there is an upper bound transition time rule defined, the Default batch maximum duration isn't used. The duration of the batch can be longer than the Default batch maximum duration.
- Click on the dit icon to define an event. Each event is defined by a transition in an input tag. You can also define hard rules to be respected in the transitional period. You can create as many steps as needed with different transition condition types:
- Enter the Output Tag Name. This is the name of the created tag in the batch structure. The output tag corresponds to one step in the batch structure.
- Enter the Input Tag, this is the tag that is going to be used for the transition. The software processes records associated with the input tag to identify transitions that match from and to condition.
- Enter From Condition, this is the condition that should be met before the transition. There the option to use ANYTHING or enter a VALUE (equal to, less than, between, etc.).
- Enter To Condition, this is the condition that should be met after the transition. There the option to use ANYTHING or SOMETHING ELSE or enter a VALUE (equal to, less than, between, etc.).
- Click on Close, once the step is defined.
- Click on Delete Batch Structure Tag, to delete the step.
- Use the arrows up and down to change the sequence of the steps.
- To copy the batch step click on the Copy icon.
- To add a new equipment click on + Parallel Equipment Template.
Batch Step
For each batch, there is a new record for the tag (batch-step-X). The record will be saved at the same time as the record time (batch-start-time). The value of the record will be computed based on the rule defined for this tag. The record value will be a transition time of the tag.
The transition time is first the time when the tag transition from condition to condition and that matches the time rules. The Tag [batch-step-X] is computed after tags [batch-start-time], [batch-end-time] because [batch-step-X] depends on them.


On Advanced tab:
In this tab it is possible to edit all the properties of the job in a JSON format. For the Batch Structure job the properties that can be edited are:
- Start Time
- Input Folder
- Dafault batch maximum duration
- Output folder
- In items, all steps and respective rules, input tags (types), can be edited.
Create a Batch Structure from time-series data
A batch structure defines the beginning and end time of a batch or phase. The batch structure is used to calculate batch features based on time-series process sensors.
Each row of the batch structure represents one batch. Each column represents time (or Batch Index in this example).

Batch Features
The batch structure is used to calculate batch features based on time-series process sensors. From this menu, create Batch features that are aggregated sensor information for a batch or phase. For example, one feature could be the average temperature between Step_A_Start and Step_A_End.
from time-series data.
- Click Manage > Jobs in the menu.
- Click + New job button on top right.
- Choose a New Job Type: BatchFeaturesTagTask.
- Click Create.
On General tab (please check the general tab explannation in Create Job):
- Put the Class name, this indicates the type of job:
- Replay tags: be.pepite.pepito.data.historian.tm.jobs.BatchFeaturesTagTask
On Properties tab - Batch Structure:
The batch structure is used to calculate batch features based on time-series process sensors.
- Go to the Batch Structure tab.
- Choose the time window to analyse. For this example, we will analyse the values across the whole batch. In “Start Tag,” select the “Batch_Start_time” tag. In “End Tag”, select the “Batch_End_time” tag.
- If you want, we can add a label to identify the tag time used for the start and end of each Batch.
- To add a new time interval, click on the button Add Time Tags. Add as many Additional Time Tags as necessary for each phase.
- Go to the Features tab.


On Properties tab - Features:
Batch features that are aggregated sensor information for a batch or phase.
Enter Input folder (folder with process sensor tags) and Output folder (folder where the new tags will be created).
Define a Prefix or Suffix for the new tags.
- Check the Append feature type, to add a feature type in output tag default names (Optional but recommended).
- Check the Append start and end, to add the start and end tag label to the output tag default names (Optional).
Select the Tag from the temporal data to compute the new tags/features.
Choose the Start Time Tag and the End Time Tag of the phase of interest (labels are created previously).
Start Shift and End Shift: Add time to shift forwards or backwards in time from Start or End times. (e.g. +/-5min) (Optional).
Choose the Function used to compute the new tag/feature.
Define a name for the new tag (Optional) or leave it by default.
- Click on + Add Feature to add a new Tag feature.
- Click on + Bulk add, to generate features from all possible combinations from selected parameters. Therefore you can select the Start Time and End Time Tags, Shifts, if required, then select all tags from the variable picker, click on + to select the functions. Click on Generate features.

Each “Function” calculates a value from data based on Start and End times (time window) >= Start Time and < End Time:
Function | Description |
|---|---|
Avg | Weighted arithmetic mean (average) within the time window. |
Count | It counts the number of tag values during a batch. |
EndValue | Last value within the time window. |
Integration | It integrates values within the time window (in seconds!). |
Max | Maximum value within the time window. |
MaxAbsDerivative | Maximum absolute derivative within the time window. |
MaxDerivative | Maximum derivative within the time window. |
Min | Minimum value within the time window. |
MinAbsDerivative | Minimum absolute derivative within the time window. |
MinDerivative | Minimum derivative within the time window. |
| MostProbableSymbol | Most present/probable symbol within a time window (longest cumulative time). |
| Previous | Previous value before the time window. |
| StartValue | First value within the time window. |
| Stdev | Standard deviation within the time window. |
| Sum | Sum of values within the time window. |
| Custom | Choose a custom function (created specifically within a given job). |
On Properties tab - Durations:
The duration is computed between two tags of the batch structure. The output is end tag time minus start tag time.
Enter Output folder, folder where the new tags will be created.
Define a Prefix or Suffix for the new tags, they are the Prefix or Suffix for duration tags default names
- Select the Start, that is any time tag from batch structure.
- Select the End, that is any time tag from batch structure.
Choose a Name for the duration tag, if left empty, the tag name will be automatically generated.
Select the Units for the duration, the options are: Days = d, Hours = h, Minutes = min, Seconds = s and Milliseconds = ms.

On Properties tab - Custom Functions:
If you want to create a specific function, switch to tab Custom Functions (Beta).
Click on the button + Add new custom function” and write a script in javascript (advanced skills).

On Properties tab - Generic Tags:
When batch process have parallel &/or identical pieces of equipment, it is possible to use the “Generic Tags” functionality to create common features across multiple pieces of equipment and then analyse and compare them.
Generic tags
Use Generic tag, if batch process have parallel &/or identical pieces of equipment, itcreates a common features across multiple pieces of equipment.

Batch features without using Generic Tags:

Batch features using Generic Tags:

In Generic Tags tab, lick on the button “+ Add new generic equipment” to add new equipment.
- You can Select generic equipment, if it is the first one it will only appear Nameless New Config.
Choose a Name for your equipment (e.g. Fermentor ).
In Discriminant tag path put the tag path of your equipment that is in your batch structure (e.g. Batch structure beer process/Fermentor). It is a symbolic tag that defines which equipment is used for the batch. The values should be time aligned with the batch structure.
In Discriminant values add the symbols that correspond to your equipment (1 equipment symbol/row). All discrimant tag's symbolics values, one value per line.
Click on the button + New Generic Tag.
Add a Generic Tag Name (e.g. Temperature_Fermentor).
Match the temporal variables (e.g. Temperature) for each equipment with the discriminant value corresponding
Add a Generic Tag Name (e.g. Volume_Fermentor).
Match the temporal variables (e.g. Volume) for each equipment with the correspondent discriminant value.
Go to the Features tab.
Click on the double arrows to open pop-up menu that lists existing generic tags.
Choose a generic tag name (e.g. Volume_Fermentor), choose the function as “EndValue” to compute a new generic feature tag. Calculate the EndValue of each batch in function of the equipment used.


Be notified by email when data stops arriving in the Lake
Edit Jobs
Click Admin > Tasks (Jobs) in the menu.
Click Edit icon.
Make changes.
Click Save.
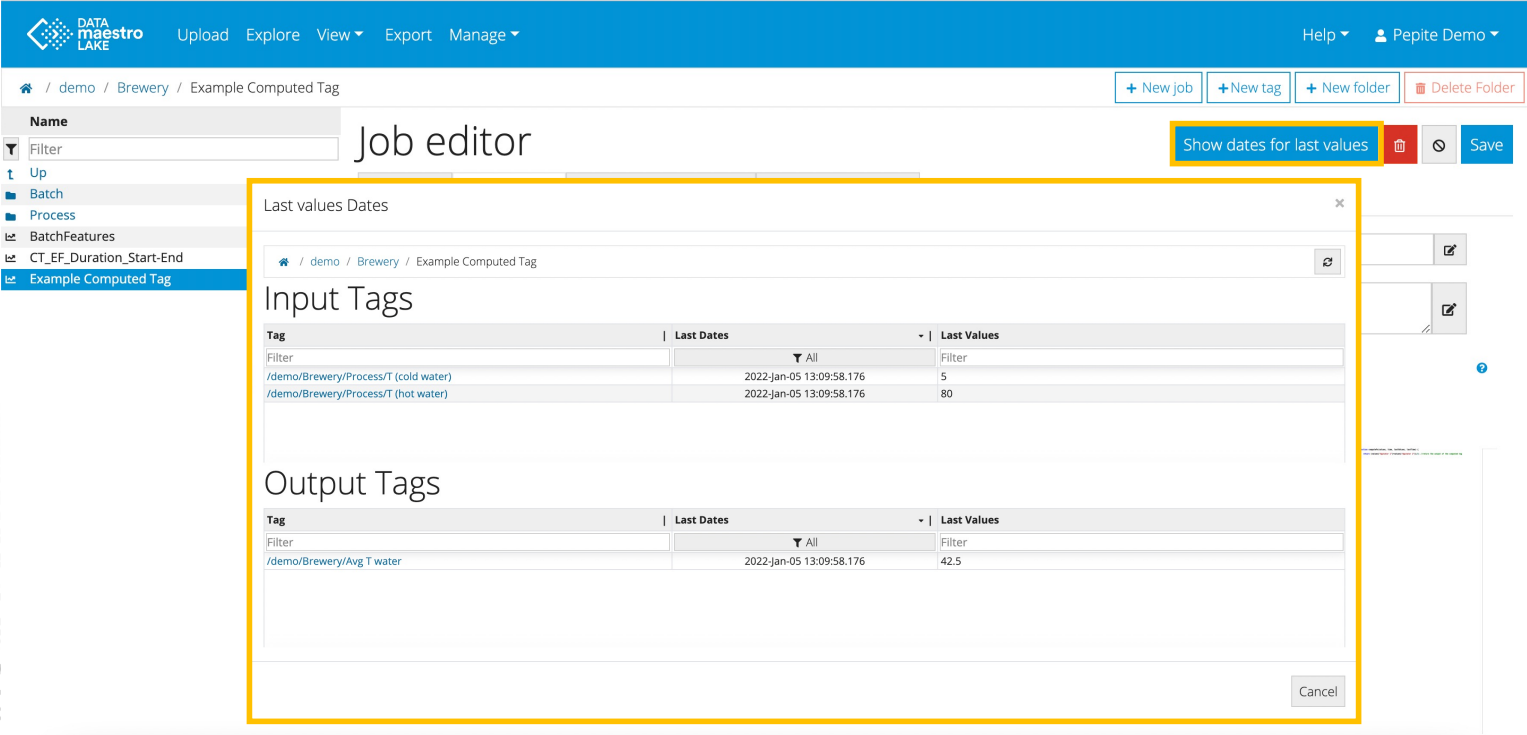
Check Last Values
Check last values and dates within Lake Jobs.