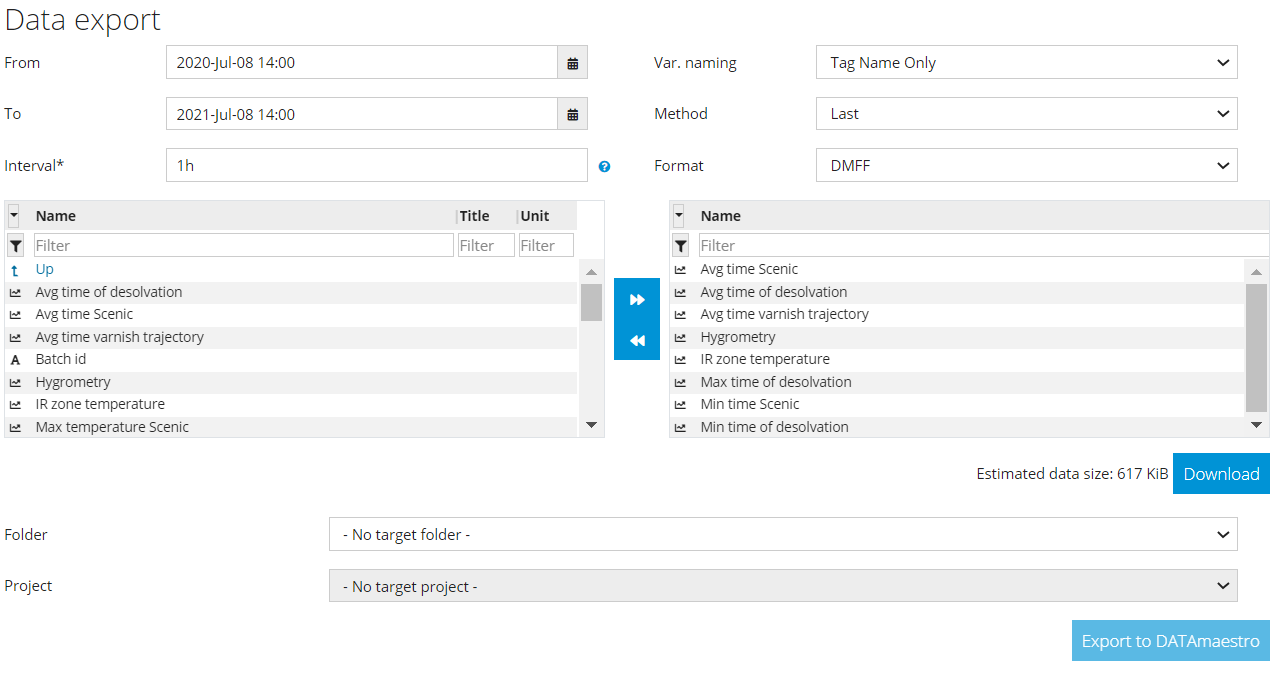
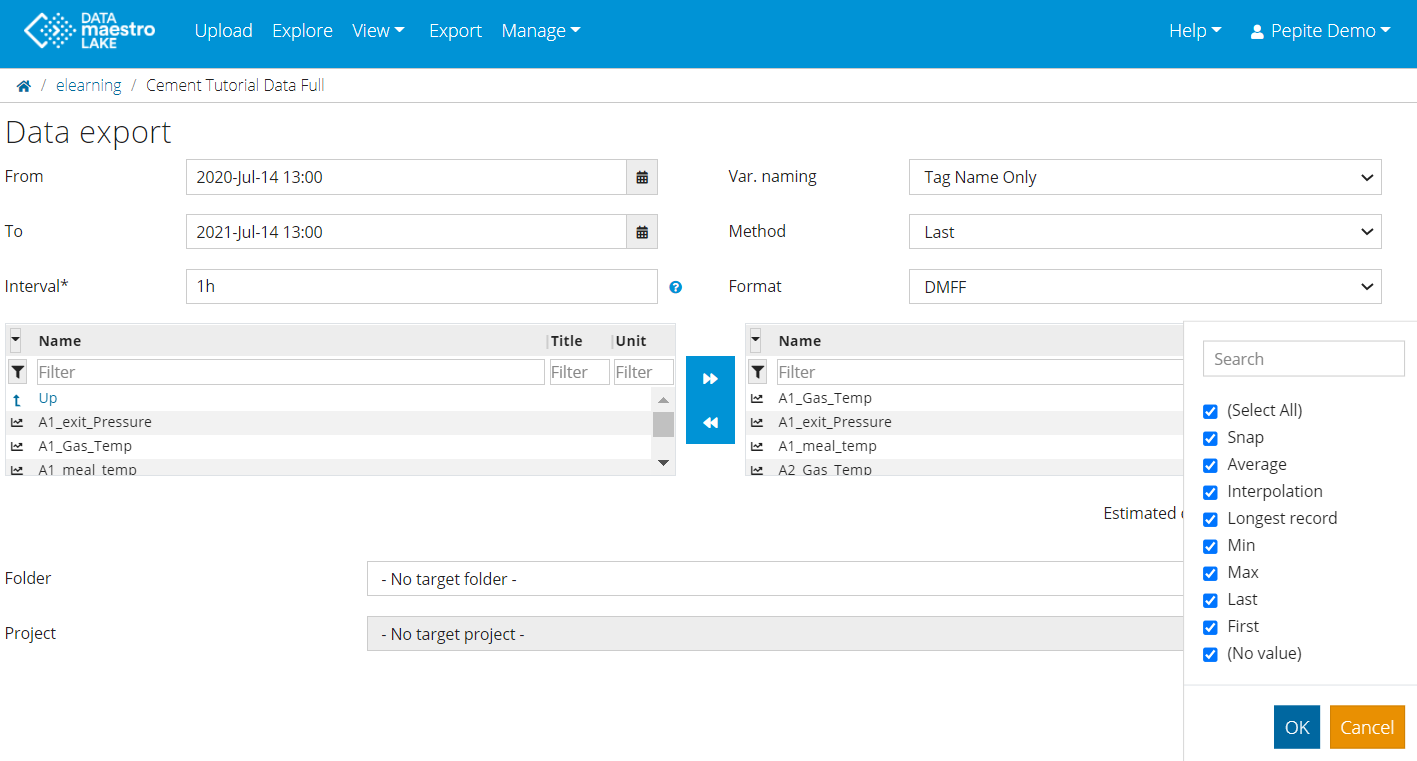
This features allows the user to export desired data from a specific DATAmaestro Lake folder to any pre-existing DATAmaestro project A .dmff file is created with the desired subset of data (period, frequency, variables) stored in the DATAlake and uploaded (export) it to a specific DATAmaestro project or onto the user’s local drive. Remark: Data from different DATAlake directories can be merged into a single export .dmff file and thus be used simultaneously for analysis in a DATAmaestro project. To export :- Click Export in the main menu.
- Select From, set date followed by hour and minutes.
- Select To, set date followed by hour and minutes. For each time step the window changes proposing new choices.
- Select Var. Naming to choose the tag name. Options: Tag Name Only, Subpath [sub/tag], Full path [/project/sub/tag]. Examples: Gas flow, Chemicals/Gas flow or /demo/Chemicals/Gas flow.
- In Format, select DMFF, CSV or numpy files.
- Select Sample time based on to define when the data is sampled. It defines the output timestamps.
- Fixed interval: data is sampled periodically. E.g. every hour, every minute. The time interval between 2 records is defined at the Sampling interval. The Sampling interval is constant.
- Reference tag time: data is sampled at the timestamps of one tag called the Reference tag. The Sampling interval is variable.
- Time from all tags: data is sampled at the timestamps of all sampled tags. The sampling interval is variable. It was previously known as Raw.
Enter Sampling Interval, it defines desired data sampling frequency or data intervals, for example, a database which should have one value every hour should enter “1h” in this field. Other common period examples include:
If you select Fixed interval,enter a Sampling interval. If you select Reference tag time, you can select the reference tag time at the list. If you select Time from all tags, data is sampled at the timestamps of all sampled tags, therefore, the Sampling Interval is not displayed.
Range (Shortcuts) | Description | 1s | Extract data at 1 second intervals | 5m | Extract data at 5 minute intervals | 1h | Extract data at 1 hour intervals | 7d | Extract data at 7 day intervals |
Select Method, options: Average, Interpolation, Longest record, Minimum and Maximum, Last and First values. Snap method is obsolete. | Method | Description | Method type |
|---|
| Average | The average method calculates the weighted arithmetic mean which is based on the value and the duration of each value that spans the given period or time window. For more information on Method average please check below. The formula is: 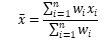 Image Modified Image Modified
which expands to 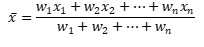 Image Modified Image Modified where wi are the weights (or durations) and xi are the values. (1) Source: Average Wikipedia | Info |
|---|
| Use Average for numerical variables like pressures, temperatures and flows. |
| Forward | | Linear interpolation is a type of interpolation which generates new values based on an existing set of values. It is achieved geometrically by drawing a straight line between two adjacent points. If the known points are given by the coordinates (x0,y0) and (x1,y1) , the linear interpolant is a line between these points. For a value x in the interval (x0,x1), the value of y along the straight line is given from the equation of slopes (1). It is useful for continuous values. Moreover the interpolation method is only calculated if there is no recorded value at a time stamp. 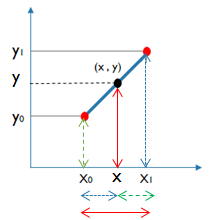

(1) Source: Wikipedia - Linear Interpolation
| Info |
|---|
Use Interpolate for numerical variables like pressures, temperatures and flows. |
| Centered | | Longest record | Selects the single recorded value or class that has the longest duration for each Period or time window. If the same value or symbol appears twice, the durations are not accumulated. | Info |
|---|
We often use “Longest Record” for symbolic (or numerical) variables like product names or machine states, where it doesn’t make sense to interpolate or average those variables. |
| Forward | | Minimum | Selects the lowest/minimum recorded value for each Period or time window. If there is no record in the time window, last value is returned. | Forward | | Maximum | Selects the highest/maximum recorded value for each Period or time window. If there is no record in the time window, last value is returned.
| Info |
|---|
You may choose to work with “Min” or “Max” if you are searching for particular events in your data. For example, if you want to know if a valve opened (0 or 1) even once during a time window, you could use “Max”. |
| Forward | | Last | Selects the last recorded value at or before a given time.
| Info |
|---|
You may choose “Last” for a lab product quality measurement, given that the last known value for quality was this last lab measurement. You may also choose “Last” for any variables that are measured “on-change” where the last known value is true until a new value is recorded. |
| Backward | | First | Selects the first recorded value at or after a given time. | Forward | | Snap (Obsolete) | The snap methods samples by taking the last stored value within each time interval. In case there are no stored values within a given interval the snap method considers the last value stored. An instantaneous value at each time interval will be extracted, no aggregation is provided. | Forward |
| Info |
|---|
| Note: If you choose as Sampling time based on as Time from all tags data is sampled at the timestamps of all sampled tags. The sampling interval is variable. In this case, so far, the only Method available is Last. |
- To select the desired list of variables, firstly choose the Folder where the tags are stored.
- Select Tags from the tags’ lists and click the Right arrow to add them to the list for export. To remove a tag from the export list select the Tag and click the Left Arrow.
- Repeat steps 7 and 8 to select tags from multiple directories.
- Click Download, this downloads a DMFF, CSV or numpy files to the user’s local drive.
|
| Users | Advanced users |
|---|
| Sampling time | Limit | Help | Limit |
| | Download csv | Fixed interval | | - text before download && button disabled
|
|
| |
| |
| | Time from all tags | | - text before download && button disabled
|
| - popup : file may be very large
| |
| |
| | Reference tag | | - text before download && button disabled
|
|
| | Download DMFF | Sampled | |
| |
| | Time from all tags | | - text before download && button disabled
|
|
| |
| |
| | | | | | Reference tag | |
| |
| | Export DMFF | Fixed interval |
|
|
|
| | Time from all tags | | - text before download && button disabled
|
|
| | | | | | Reference tag |
|
|
|
| | Tags Extract (analytics) | Fixed interval |
|
|
|
| | Time from all tags | | | | | | | | | | Reference tag |
|
|
|
|
*: very unlikely to happen
| Info |
|---|
| title | Convert unix time to excel time |
|---|
| To convert the timestamp in unix time (ms) to excel time, use this formula: =((UNIXTIME/60/1000)/60/24)+DATE(1970;1;1)+(2/24) for GMT +02:00 |
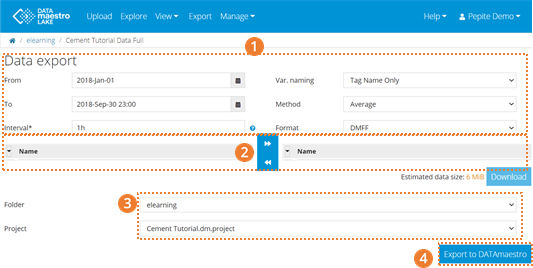
To export a file directly to DATAmaestro Analytics: - Choose the DATAmaestro Folder.
- Choose a DATAmaestro Project.
- Click Export to DATAmaestro.
- Note: Pop-ups must be enabled for this website. If pop-ups are blocked, enable pop-ups and then click Export to DATAmaestro.
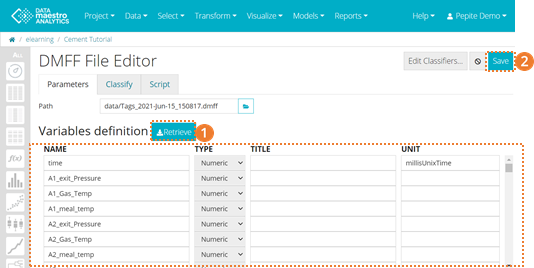
- DATAmaestro Analytics will open in a new Tab/Window. Under Variables Definition, select “Retrieve” and then click “Save” to complete the export to the DATAmaestro Analytics project .
- Note: For large data sets there may be a delay between clicking export and the project opening in DATAmaestro Analytics.
|
| User | Advanced user |
|---|
| Method | Limit | Limit | Export DMFF
| Sampled |
|
| | Raw | |
| | | Tags Extract (Analytics)
| Sampled |
|
| | Raw | | | | |
Export Method: Average
The average method calculates the weighted arithmetic mean which is based on the value and the duration of each value that spans the given period or time window. The table below shows how the average exported data is calculated. Raw Data
| Exported Data |
|---|
DateTime (dd/MM/yyyy HH:mm:ss) | Raw values | DateTime (dd/MM/yyyy HH:mm:ss) | Average Values | (Weighted) Average Formula |
|
| 01/10/2019 15:37:00 | 30 | =(25*30+36*25)/55 | | 01/10/2019 15:37:05 | 25 |
|
|
| | 01/10/2019 15:37:35 | 36 |
|
|
|
|
| 01/10/2019 15:38:00 | 33.167 | =(36*5+42*30+22*25)/60 | | 01/10/2019 15:38:05 | 42 |
|
|
| | 01/10/2019 15:38:35 | 22 |
|
|
|
|
| 01/10/2019 15:39:00 | 24.167 | =(22*5+23*30+26*25)/60 | | 01/10/2019 15:39:05 | 23 |
|
|
| | 01/10/2019 15:39:35 | 26 |
|
|
|
|
| 01/10/2019 15:40:00 | 25.917 | =(26*5+25*30+27*25)/60 | | 01/10/2019 15:40:05 | 25 |
|
|
| | 01/10/2019 15:40:35 | 27 |
|
|
|
|
| 01/10/2019 15:41:00 | 27.083 | =(27*5+28*30+26*25)/60 | | 01/10/2019 15:41:05 | 28 |
|
|
| | 01/10/2019 15:41:35 | 26 |
|
|
|
Export Method: InterpolationLinear interpolation is a type of interpolation which generates new values based on an existing set of values. It is achieved geometrically by drawing a straight line between two adjacent points. It is useful for continuous values. Moreover the interpolation method is only calculated if there is no recorded value at a time stamp. (1) More information in Wikipedia - Linear Interpolation The table below shows how the interpolation exported data is calculated.
| Raw Data | Exported Data |
|---|
DateTime (dd/MM/yyyy HH:mm:ss) | Raw values | DateTime (dd/MM/yyyy HH:mm:ss) | Interpolated values |
|
| 01/10/2019 15:37:00 | - | | 01/10/2019 15:37:05 | 25 |
|
| | 01/10/2019 15:37:35 | 36 |
|
|
|
| 01/10/2019 15:38:00 | 41* | | 01/10/2019 15:38:05 | 42 |
|
| | 01/10/2019 15:38:35 | 22 |
|
|
|
| 01/10/2019 15:39:00 | 22.833 | | 01/10/2019 15:39:05 | 23 |
|
| | 01/10/2019 15:39:35 | 26 |
|
|
|
| 01/10/2019 15:40:00 | 25.166 | | 01/10/2019 15:40:05 | 25 |
|
| | 01/10/2019 15:40:35 | 27 |
|
|
|
| 01/10/2019 15:41:00 | 27.833 | | 01/10/2019 15:41:05 | 28 |
|
| | 01/10/2019 15:41:35 | 26 |
|
|
*At 15:38:00, the interpolation method considers the previous value 36 at 15:37:35 and the next value 42 at 15:38:05. The new interpolated value is 41, calculated as follows: 36 + ((42-36)/30)*25. Export Method: Longest recordSelects the single recorded value or class that has the longest duration for each Period or time window. If the same value or symbol appears twice, the durations are not accumulated.
| Raw Data | Exported Data |
|---|
DateTime (dd/MM/yyyy HH:mm:ss) | Raw values | DateTime (dd/MM/yyyy HH:mm:ss) | Longest record values |
|
| 01/10/2019 15:37:00 | 25 | | 01/10/2019 15:37:05 | 25 |
|
| | 01/10/2019 15:37:35 | 36 |
|
|
|
| 01/10/2019 15:38:00 | 42 | | 01/10/2019 15:38:05 | 42 |
|
| | 01/10/2019 15:38:35 | 22 |
|
|
|
| 01/10/2019 15:39:00 | 23 | | 01/10/2019 15:39:05 | 23 |
|
| | 01/10/2019 15:39:05 | 26 |
|
|
|
| 01/10/2019 15:40:00 | 25 | | 01/10/2019 15:40:05 | 25 |
|
| | 01/10/2019 15:40:35 | 27 |
|
|
|
| 01/10/2019 15:41:00 | 28 | | 01/10/2019 15:41:05 | 28 |
|
| | 01/10/2019 15:41:35 | 26 |
|
|
Export Method: Minimum Selects the lowest/minimum recorded value for each Period or time window. If there is no record in the time window, last value is returned.
| Raw Data | Exported Data |
|---|
DateTime (dd/MM/yyyy HH:mm:ss) | Raw values | DateTime (dd/MM/yyyy HH:mm:ss) | Minimum Values |
|
| 01/10/2019 15:37:00 | 25 | | 01/10/2019 15:37:05 | 25 |
|
| | 01/10/2019 15:37:35 | 36 |
|
|
|
| 01/10/2019 15:38:00 | 22 | | 01/10/2019 15:38:05 | 42 |
|
| | 01/10/2019 15:38:35 | 22 |
|
|
|
| 01/10/2019 15:39:00 | 22 | | 01/10/2019 15:39:05 | 23 |
|
| | 01/10/2019 15:39:35 | 26 |
|
|
|
| 01/10/2019 15:40:00 | 25 | | 01/10/2019 15:40:05 | 25 |
|
| | 01/10/2019 15:40:35 | 27 |
|
|
|
| 01/10/2019 15:41:00 | 26 | | 01/10/2019 15:41:05 | 28 |
|
| | 01/10/2019 15:41:35 | 26 |
|
|
Export Method: MaximumSelects the highest/maximum recorded value for each Period or time window. If there is no record in the time window, last value is returned.
| Raw Data | Exported Data |
|---|
DateTime (dd/MM/yyyy HH:mm:ss) | Raw values | DateTime (dd/MM/yyyy HH:mm:ss) | Maximum values |
|
| 01/10/2019 15:37:00 | 36 | | 01/10/2019 15:37:05 | 25 |
|
| | 01/10/2019 15:37:35 | 36 |
|
|
|
| 01/10/2019 15:38:00 | 42 | | 01/10/2019 15:38:05 | 42 |
|
| | 01/10/2019 15:38:35 | 22 |
|
|
|
| 01/10/2019 15:39:00 | 26 | | 01/10/2019 15:39:05 | 23 |
|
| | 01/10/2019 15:39:35 | 26 |
|
|
|
| 01/10/2019 15:40:00 | 27 | | 01/10/2019 15:40:05 | 25 |
|
| | 01/10/2019 15:40:35 | 27 |
|
|
|
| 01/10/2019 15:41:00 | 28 | | 01/10/2019 15:41:05 | 28 |
|
| | 01/10/2019 15:41:35 | 26 |
|
|
Export Method: Last Selects the last recorded value at or before a given time.
| Raw Data | Exported Data |
|---|
DateTime (dd/MM/yyyy HH:mm:ss) | Raw values | DateTime (dd/MM/yyyy HH:mm:ss) | Last values |
|
| 01/10/2019 15:37:00 | - | | 01/10/2019 15:37:05 | 25 |
|
| | 01/10/2019 15:37:35 | 36 |
|
|
|
| 01/10/2019 15:38:00 | 36 | | 01/10/2019 15:38:05 | 42 |
|
| | 01/10/2019 15:38:35 | 22 |
|
|
|
| 01/10/2019 15:39:00 | 22 | | 01/10/2019 15:39:05 | 23 |
|
| | 01/10/2019 15:39:35 | 26 |
|
|
|
| 01/10/2019 15:40:00 | 26 | | 01/10/2019 15:40:05 | 25 |
|
| | 01/10/2019 15:40:35 | 27 |
|
|
|
| 01/10/2019 15:41:00 | 27 | | 01/10/2019 15:41:05 | 28 |
|
| | 01/10/2019 15:41:35 | 26 |
|
|
Export Method: First Selects the first recorded value at or after a given time.
| Raw Data |
| Exported Data |
|
|---|
DateTime (dd/MM/yyyy HH:mm:ss) | Raw values | DateTime (dd/MM/yyyy HH:mm:ss) | First values |
|
| 01/10/2019 15:37:00 | 25 | | 01/10/2019 15:37:05 | 25 |
|
| | 01/10/2019 15:37:35 | 36 |
|
|
|
| 01/10/2019 15:38:00 | 42 | | 01/10/2019 15:38:05 | 42 |
|
| | 01/10/2019 15:38:35 | 22 |
|
|
|
| 01/10/2019 15:39:00 | 23 | | 01/10/2019 15:39:05 | 23 |
|
| | 01/10/2019 15:39:35 | 26 |
|
|
|
| 01/10/2019 15:40:00 | 25 | | 01/10/2019 15:40:05 | 25 |
|
| | 01/10/2019 15:40:35 | 27 |
|
|
|
| 01/10/2019 15:41:00 | 28 | | 01/10/2019 15:41:05 | 28 |
|
| | 01/10/2019 15:41:35 | 26 |
|
|
Export Method: Snap The snap methods samples by taking the last stored value within each time interval. In case there are no stored values within a given interval the snap method considers the last value stored. An instantaneous value at each time interval will be extracted, no aggregation is provided. This method is only available for backward compatibility. It is only useful if a previous extraction have been done with Snap method and the same result is needed. In other cases, Last and First methods should fill the needs and are simpler. The table below shows how the snap exported data is selected. | Raw Data | Exported Data |
|---|
DateTime (dd/MM/yyyy HH:mm:ss) | Raw values | DateTime (dd/MM/yyyy HH:mm:ss) | Snap values |
|
| 01/10/2019 15:37:00 | 36 | | 01/10/2019 15:37:05 | 25 |
|
| | 01/10/2019 15:37:35 | 36 |
|
|
|
| 01/10/2019 15:38:00 | 22 | | 01/10/2019 15:38:05 | 42 |
|
| | 01/10/2019 15:38:35 | 22 |
|
|
|
| 01/10/2019 15:39:00 | 26 | | 01/10/2019 15:39:05 | 23 |
|
| | 01/10/2019 15:39:35 | 26 |
|
|
|
| 01/10/2019 15:40:00 | 27 | | 01/10/2019 15:40:05 | 25 |
|
| | 01/10/2019 15:40:35 | 27 |
|
|
|
| 01/10/2019 15:41:00 | 26 | | 01/10/2019 15:41:05 | 28 |
|
| | 01/10/2019 15:41:35 | 26 |
|
|
| Info |
|---|
| title | Combine different sampling methods |
|---|
| Did you know you can combine different sampling methods? Change them by clicking here or above before selecting the variables from the left. |
| Info |
|---|
| title | Update data extraction |
|---|
| Now that you have exported a data source , every time you export data from Lake to Analytics , you will learn how to update your data extraction using you have at your disposal a Tag Extract task automatically created in your Analytic's project. This task will allow you to modify the extraction without having to redo everything in the Lake Export. |
- Go to DM Lake, then Export and fill all the information, you must go through all the steps presented previously.
- Select the new tags.
- Choose the Folder and Project where you want to export the data.
- Click on Export to DATAmaestro.
- You are directed to the selected project in DM Analytics. Now you have two options:
- To replace the existing datasource (all tasks will be automatically updated): Click on Load data in without changing the selected file in the drop down (Recommended).
- To add a new datasource to your project. It is possible to work with multiple datasources in a project, however each task can only use one datasource (no merging provided).
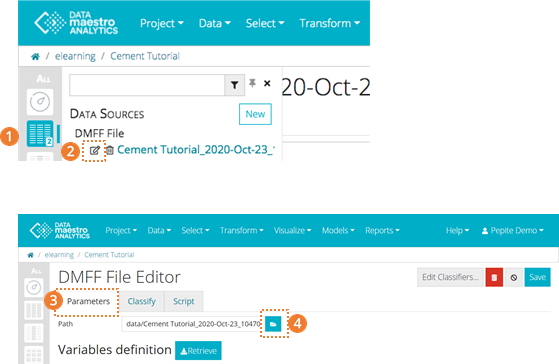
To replace the existing datasource (all tasks will be automatically updated): in DATAmaestro Analytics, click on Load data in without changing the selected file in the drop down (Recommended). More than one data sources can complexify your project. Before creating a task, first you must select the data source. So, it is advisable to have only one data source in a project. - Go to data sources icon.
- Click on Edit of the Cement_Tutorial_XXX DMFF file.
- Go to Parameters tab.
- Click on the folder icon.
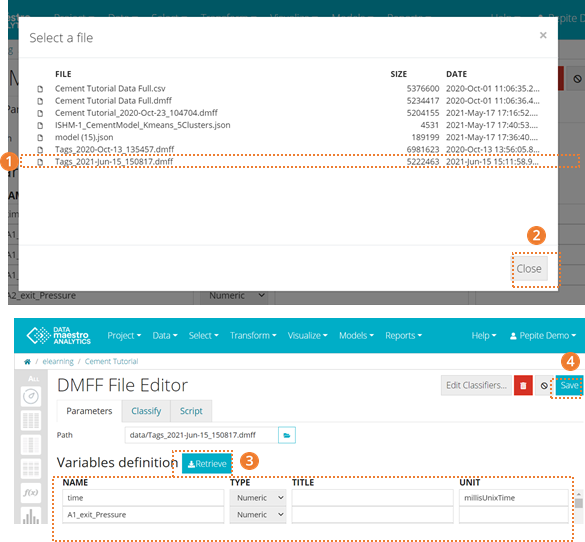
- Search and select the file you have just exported.
- Click Close.
- In Parameters, click on Retrieve to retrieve you tags to the project.
- Click on Save.
- You have now updated your existing datasource.
To add a new datasource to your project. It is possible to work with multiple datasources in a project, however each task can only use one datasource (no merging provided). - Once your export has finished and you are redirected to DATAmaestro Analytics, click on Retrieve to retrieve your tags in the project.
- Click on Save.
You have now added a second datasource to your project. Under the datasource icon, you will see two datasources.
| Info |
|---|
| Note on DMFF file the will replace an existant DMFF both with the same name. This means that if the same file is used in two different Analytics projects (for example, if you create a copy of the project) and if the DMFF is updated in only one project, but both projects have the same file name, the DMFF file will be automatically updated in the other project too. |
|