Upload CSV or DMFF file This features allows the user to upload data (.csv or .dmff file format) to build (or complete) the database that will be used in any future DATAmaestro projects. Data is uploaded from your local computer drive onto the DATAmaestro cloud server and saved in a specific DATAmaestro Lake Folder to ensure complete data security. Once uploaded, it is possible to export data entirely and/or partially to any DATAmaestro Analytics projects. This provides a high-degree of flexibility in data preparation, while maintaining data integrity. To upload a CSV or DMFF file:Click Upload in the main menu. Click Choose file to select the file to be uploaded. Remark: CSV and DMFF files can be uploaded. Check CSV Preview. While uploading data from CSV, the software automatically detects the file format (Column Delimiter and Number Format) and provides a preview of the file content and how it is read by the system. Have your columns been correctly identified and separated? Click on Forward Backward arrows to move through database one frame at the time. Click on Option-Left or - Right arrows to jump to the end or beginning of the dataset. | Info |
|---|
| Preview attempts to interpret your data (Date columns, numerical or symbolic variables), different colour is assigned to the column, depending on the type data type original value below. Hover over the “eye” to display the original value below. |
Select Delimiter - Options: comma (default) or semicolon. File formats that use delimiter-separated values store arrays of data by separating the values in each row with specific delimiter characters. Any character can be used to separate values but most common are comma, tab and colon. CSV stands for comma-separated values but many datasets use a delimiter other than a comma. Typically, if you decimal separator (number format is decimal, then your delimiter is a comma, while a comma number format generally indicates a semicolon delimiter). Select Number format. Options: 1234.50 (default) or 1234,50 Select the variables defined in headers. Checkbox Variables names defined in headers? is checked by default. Generally used if the file has more than one header. Select in Row 1 the definition of the header. Options: name,title, unit, classifier or skip. + Add Header Row to add more headers. | Info |
|---|
| Classifiers are metadata saved to a data file (DMFF or CSV). It classifies variables according to different categories. Categories include type (symbolic/numerical), Parameter, Location, etc. For example, the variable “Steel plate thickness” can be classified as a Parameter defined as a “Dimension” and the variable “Chemical type” can be classified as a Parameter defined as a “Chemical”. For more information please check Classify Variables. |
Are your characters displayed correctly? If characters are not displayed correctly select the Charset click on Characters are not displayed correctly ? on bottom right corner of table. The web browser must know which Charset (Character Set or Character Encoding) to use, in order to display an HTML page correctly. Options: UTF-8 (Unicode) covers almost all characters and symbols in the world, it is used by default; ISO-8859-1 supports 256 different character codes; windows-1252 is the original Windows character sets which support for 256 character codes. Mac Roman is a character encoding used by classic Mac OS to represent the text. Click Next. Check CSV Preview. Have your columns' type been correctly identified as numerical, symbolic or time? If no temporal variable is available, a message appears on top right corner of the table: Warning: No temporal column selected. If your file has no temporal column, please upload it directly in DATAmaestro Analytics > Quick Start Upload. If required, click on Previous to go backwards. Click Next. Click on each column, if required, to edit column information. Enter new Name, if required. Enter Title, if required. Select different type if the column's type was wrongly automatically defined: Symbolic, Numerical, Time. Enter Units, of required.
If time column is not selected, the column is blue (numerical value). Click on the column and the column information is displayed on the bottom. 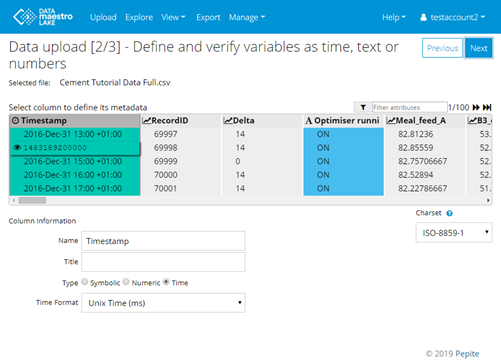 Image ModifiedNote: Temporal variables (green column), Numeric variables (grey column) and Symbolic variables (blue column). Image ModifiedNote: Temporal variables (green column), Numeric variables (grey column) and Symbolic variables (blue column). Select Time Format. Options: Excel time (default), Excel for Mac time, Unix time (ms), Unix time (s) and Text. For more information about the time format, please check Glossary. If the time information is not correctly detected, please manually correct it by trying other type settings under “Time Format”.If the Time is Text, enter the Time format. Remark: Text time is a Java format. Click on question mark to find different pattern syntax examples. Example: dd/MM/yyyy HH:mm:ss,SSS. ). Letter | Description | d | Day of the month | D | Day of the year | M | Month of the year | m | Minutes | y | Year | H | Hour (0-23) | h | Hour in AM/PM (1-12) | s | Seconds | S | Milliseconds |
| Info |
|---|
| If your data time parameter is in Unix time no time zone is required. If your data time is Excel time or Text, you can click on Click “Time zone options” to allow data to be referenced in a “universal time” reference system. |
Choose Time zone options. Example: Europe/Brussels or +02:00. This feature allows the data to be referenced in an “absolute time” reference system and thus to be compared with other data extracted at other time zones. Use Default to set as Region, defined as the time zone option by default. Region (eg. Europe/Brussels): Select this option if the data time offset compared to GMT is different in Summer compared to Winter, even if you have data that DOES NOT overlap a daylight saving boundary (less than 6 months of data). E.g. Paris is one hour ahead of Greenwich in Winter and two hours ahead of Greenwich in Summer. | Info |
|---|
| Hint 1: If your data comes from a region without daylight savings, you can select either Fixed Time Offset or Region.
Hint 2: Generally, databases and data historians use a fixed time offset. If you are still unsure, would your data have two lines for 2am in Winter and skip 2am in summer? |
Fixed Offset (+02:00): Select this option if the data is always offset a fix amount form GMT, regardless of summer or winter time changes. | Info |
|---|
| Hint 1: If your data comes from a region without daylight savings, you can select either Fixed Time Offset or Region.
Hint 2: Generally, databases and data historians use a fixed time offset. If you are still unsure, would your data have two lines for 2am in Winter and skip 2am in summer? |
Click Next. Check box Skip Existing Values. Activate if uploading data that 1/ overlaps previously uploaded data OR 2/ has duplicate times (e.g. during Daylight Saving Time change from Summer to Winter). When "Skip Existing Values" is activated, the duplicate data will be skipped (not replaced) and no error message will be displayed. If deactivated, an error message will appear. Remark: Data must be inserted chronologically. | Info |
|---|
| Data in the lake should be inserted chronologically. When data is uploaded, the csv file will be read from line 1 to last line. First data line should correspond to the lowest date-time and last data should be the highest date. It enables very fast reading performance. In the lake, it is impossible to write in the past, if the line are not chronologically (ascending). |
Choose Mode. Options: Append (to attach new data into the Folder) or Reset (to clean all data before entering new input). Choose the Current Folder, if there is already a Folder. This is the folder location where data should be saved. Enter a New sub Folder, if required. If data should be saved within a new sub-folder, create a new sub-folder by entering the name here. Click Upload.
| Info |
|---|
| After upload, the page is redirectly to the DM Lake Explorer. To check if files are uploaded correctly, select one tag, then, select the “Stats” tab. Pay attention to the date “from date” and “to date”, by default it will show statistics for the last week. Either set the date range of your data file, or delete the “From date”. |
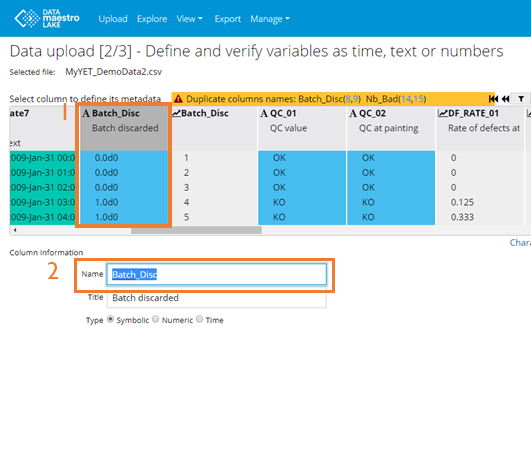
Note on Duplicate names: Sometimes there are duplicate column names in the file. The system will provide a warning and the column number(s) for the duplicates. You will be able to correct this by changing the column name at step 2 of the uploader wizard. In this example below, the duplicated column 9, Batch_Disc, is in blue. On Data upload 2/3 - Define variables as time, text or numbers: Click on the column number for each duplicate. Then under “Name” change the name of the tag.
 Note on "Skip existing values": Note on "Skip existing values":
1.Select the option “Skip existing values”: To upload data with non-monotonically increasing time stamps. Example 1: Data is not chronological. As data must be uploaded chronologically, if “Skip existing values” is not active, an error message will be displayed. If “Skip existing values” is active, the data will be uploaded, skipping the 2017 lines.
To upload data containing time stamps older than already stored data (with Append mode). Example 2: Based on the previously uploaded file in Example 1, we decide to change the values of Tag 1 and add additional lines before and after the previously uploaded data. As data is not monotonically increasing, if “Skip existing values” is not active, an error message will be displayed. If “Skip existing values” is displayed, the data will be uploaded, skipping the 2017 lines again, skipping the lines before 02:00 and duplicating the line for 10:00 (as we now have a different value). However, it will not overwrite the previously uploaded values (for that use Reset, refer next slide).
BUT, non-monotonically increasing time stamps or not properly ordered time stamps will not be uploaded (skipped).

Note to merge multiple files:To merge data files for the same variables or tags, upload them in chronological order in the same folder using the Mode “Append”. For example, there are two files both with the same tags but one file has 2018 data and the other file has 2019 data. - To merge these two files using the Lake, follow the uploader steps 1 – 3 for the 2018 file. At step 3, select a “Current Folder” e.g. “Plant1” and create a “New sub folder” e.g. “Line1” (location will be “Plant1/Line1”).
- Repeat steps 1 – 3 for the 2019 file, at step 3, select Mode Append and under current folder, select “Plant1/Line” and leave “New sub folder” blank.
To merge data files for different variables, they can be uploaded in the same or different sub-directories. At export, it is possible to export variables from different sub-directories. |