Versions Compared

Key

  • This line was added.
  • This line was removed.
  • Formatting was changed.


English us

In DATAmaestro, projects are the central theme around which all the data mining and analysis activities take place.

In simple terms, a project is a list of tasks that you define. Tasks are dynamically connected in parent-child relationships, which means that when one is updated, all the dependent tasks also change. The output from parent tasks can be used as inputs for child tasks.

Some examples of tasks:

  • record and variable sets definition
  • function variables definition 
  • charting visualizations
  • modeling methods

For example, if you create a histogram with an Record set called MySet101, and then you change this set by removing some outlier records. The project monitoring sensor will detect that all the dependent tasks on this record set have to be updated. When you view the histogram again, you will see that it has been updated.

The workflow of tasks is current and consistent because the task manager keeps every output up to date by refreshing tasks that are "outdated" immediately. Your projects are always up to date.

And you can create additional projects in a fraction of time. Simply define a data processing template and apply it to a different data source. The only thing you have to do is upload the new data source, and all children (and grand-children) tasks will be updated - automatically.

Info
titleNaming Conventions

If you are going to reuse tasks from one project, you may want to consider using a naming convention that will be meaningful for future projects. For example, it may be effective to give a record set a generic title such as, "Hydro<100".


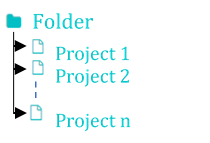
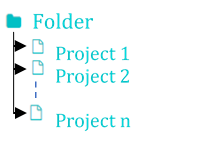
DATAmaestro analytics is organised with folders and projects. A folder contains projects. A project is a data analysis file.   

All Folders have previously been created by PEPITe. You can be granted access to one or more Folders.

Working with Folders

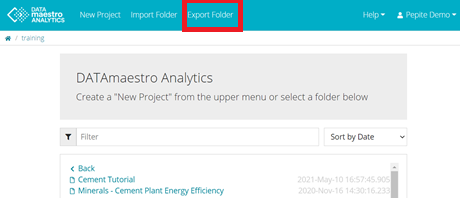
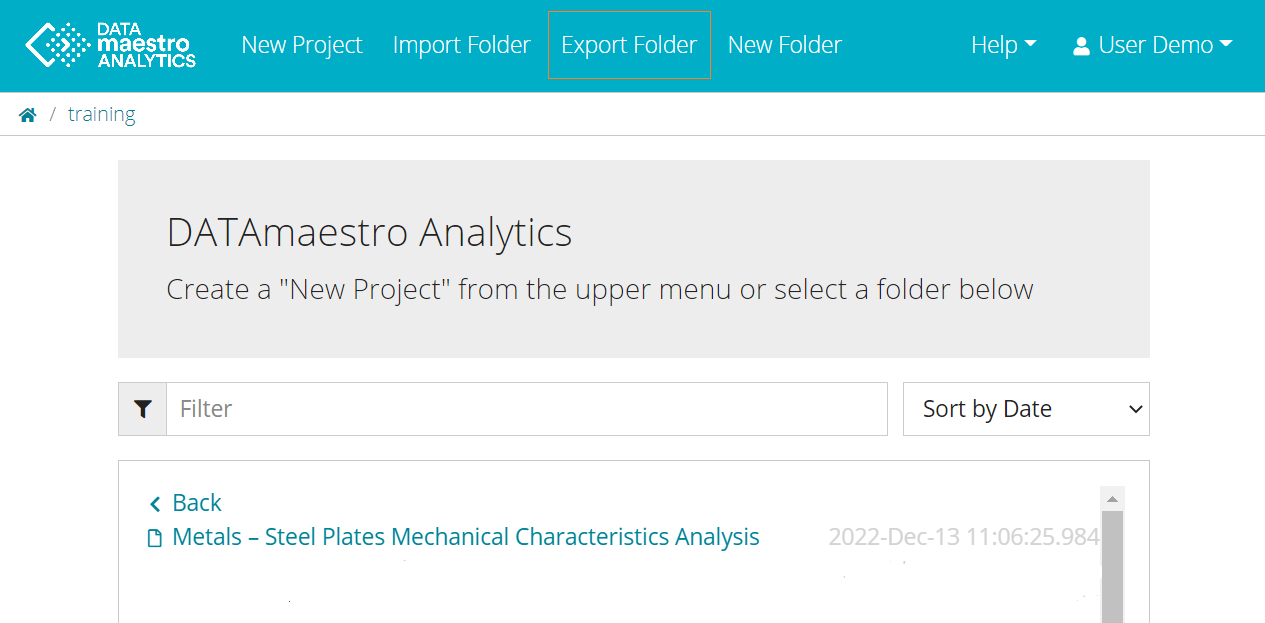
To export a folder directly from the main Analytics page:

  1. Select the folder you want to export. 
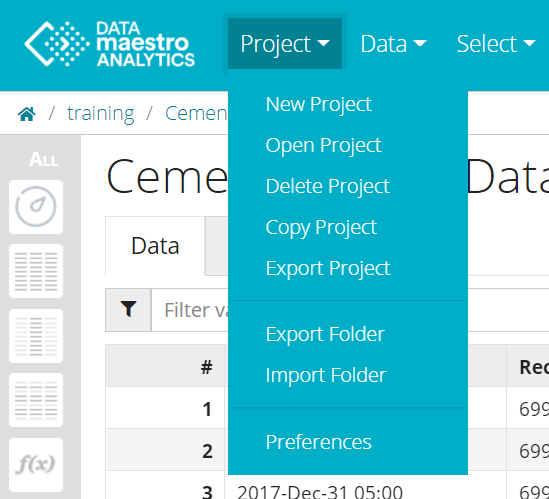
  2. From the main menu, click Export Folder. The folder is downloaded in a .zip file. 

Image RemovedImage Added

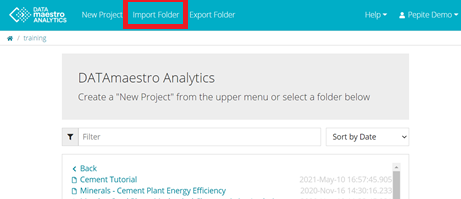
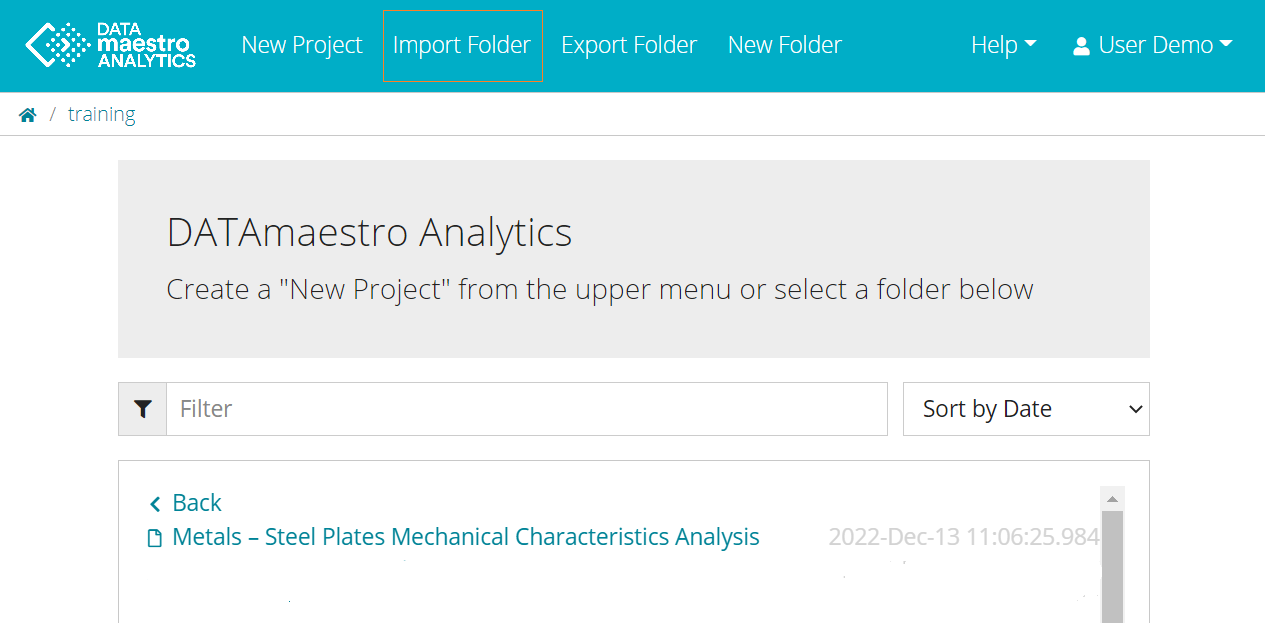
To import a folder directly from the main Analytics page: 

  1. From the menu, click Import Folder.
  2. Choose a File (. zip file) in your computer. 
  3. Select a Folder. Note that if no folder is selected, the destination folder corresponds with the zip file name. 
  4. Click Upload

Image RemovedImage Added

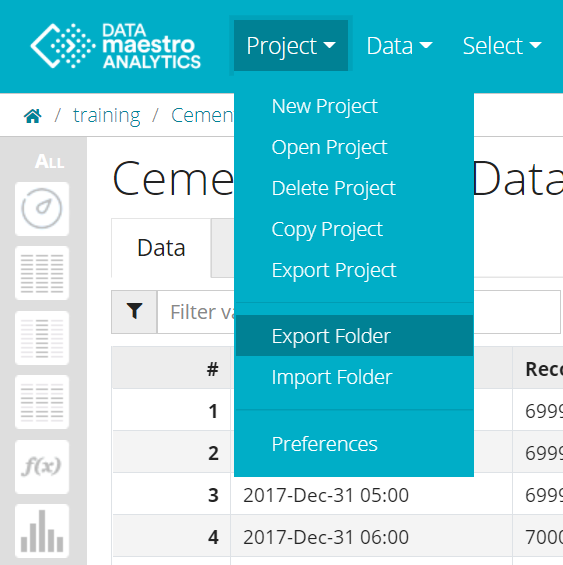
To export a folder from a DATAmaestro Analytics project:

Note that the difference is that as you are in an Analytics project, the exported folder is the current working folder (hosting the project), no other folder can be selected. 

  1. From the menu, click Project Export Folder.
  2. Folder is downloaded in .zip file containing all the projects in this particular folder. In this example "training". 

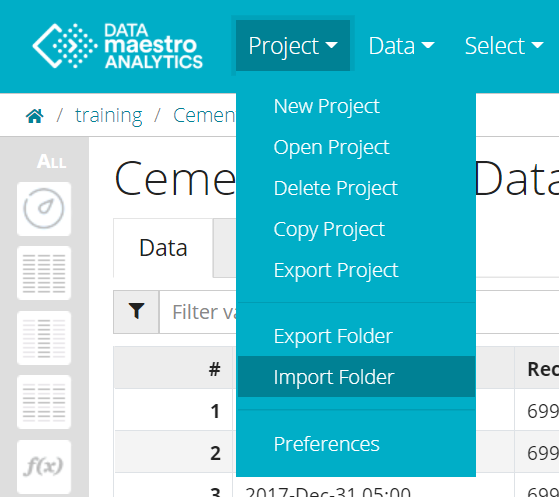
To import a folder from a DATAmaestro Analytics project: 

  1. From the menu, click Project > Import Folder.
  2. Choose a File (. zip file) in your computer. 
  3. Select a Folder. Note that if no folder is selected, the destination folder corresponds with the zip file name. 
  4. Click Upload

Info
titleCreate or Delete Analytics folder

For advance users only 


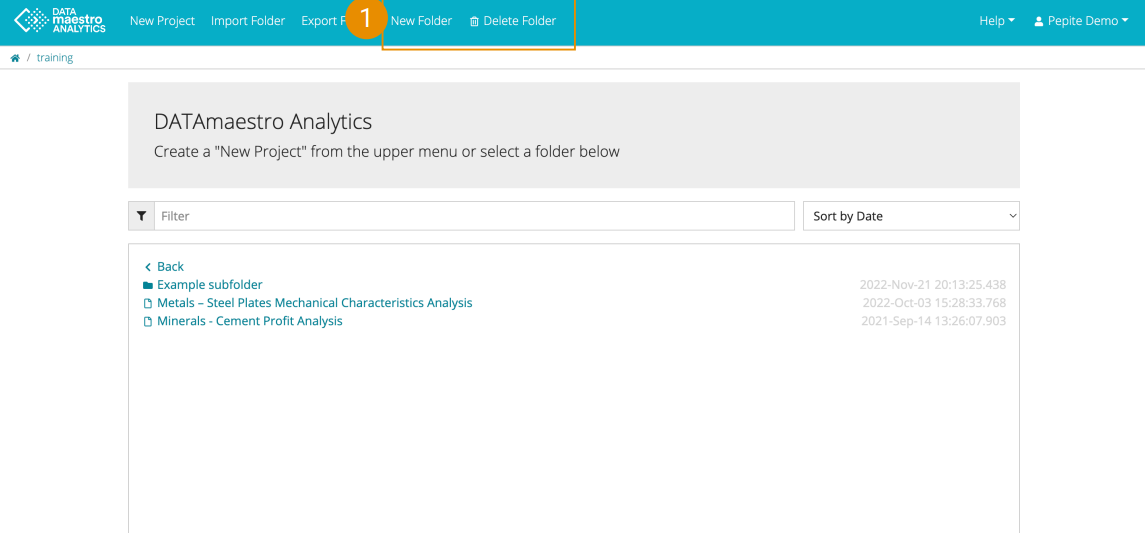
Advanced users can now create and delete subfolders in Analytics: 

  1. Organise projects into subfolders. E.g. based on process line, Analytics topic, user, etc. 

Image Added

Working with Projects

For more information, see the online learning platform

You can always create a project from scratch as described in Quick Start. But after you have created one project, you may find it efficient to simply make a copy and revise it to suit your new project.

Projects are fueled by data. To run a project, you can upload a CSV or Excel file, or use a DATAserver connection for a data source. Typically, data from a data historian is used, but any database file can be used. For more information, see Data.

To create a new project:

  1. From the menu, click Project New project.
  2. On the Create Project window, select the Folder.
  3. Enter a Name for your new project.
  4. Click Create.

To open an existing project:

  1. From the menu, click Project > Open project.
  2. Select the project from the list. 
Tip
titleViewing Multiple Projects

If you want to view more than one project at the same time, open another DATAmaestro session in your browser.

To delete a project: 

  1. Open the project you want to delete.
  2. From the menu, click Project > Delete project.
  3. Click OK to confirm. 

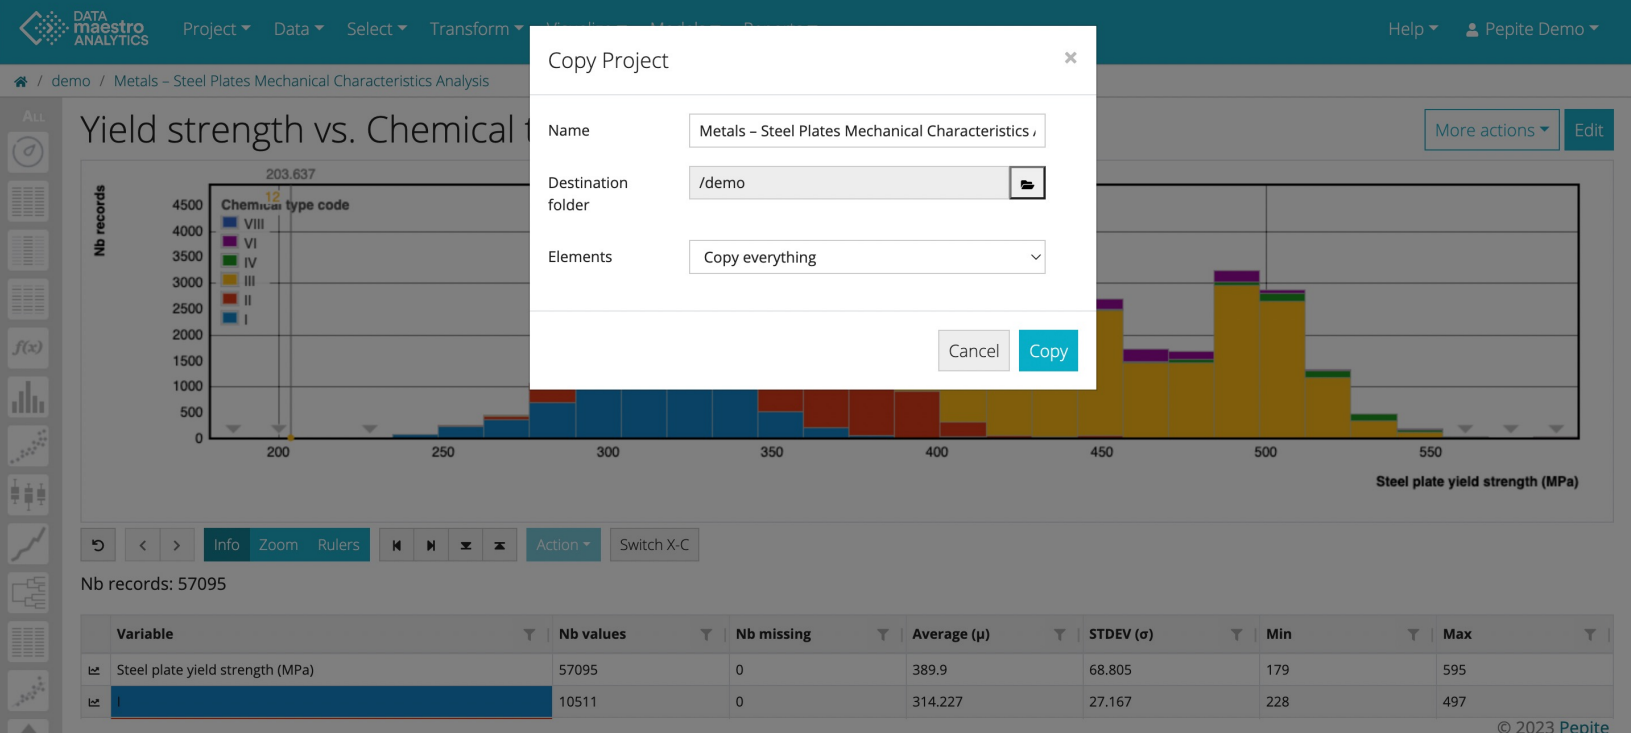
To make a copy of a project: 

  1. Open the project you want to copy.
  2. From the menu, click Project Make project copy.
  3. Enter a Name.
  4. Select the elements to be copied in Elements, possibility to Copy everything or Select elements to copy. Elements that can be selected: Data, Classifier values, Functional Variables, Record sets, Variable sets, Visualizations, Models and Others. Inside the parenthesis, it contains the information about the amount of each element


Info
titleCopy project

Define destination folder when cloning projects. You can copy a project in same or different folders

Image Added


To export a project: 

  1. Open the project you want to copy.
  2. From the menu, click Project Export project.
  3. Click on Export alone, project without the dataset or Export with Data to export the project with the dataset. 
  4. Project is downloaded in a .zip file. 

To import a project directly from the main Analytics page: 

  1. From the menu, click Import Folder. Although the button is called Import Folder, you can also import only one project. 
  2. Choose a File (. zip file) in your computer. 
  3. Select a Folder. Note that if no folder is selected, the destination folder corresponds with the zip file name. 
  4. Click Upload

To import a project from a DATAmaestro Analytics project: 

  1. From the menu, click Project > Import Folder. Although the button is called Import Folder, you can also import only one project. 
  2. Choose a File (. zip file) in your computer. 
  3. Select a Folder. Note that if no folder is selected, the destination folder corresponds with the zip file name. 
  4. Click Upload


Tip
titleAssociation of a colour with a symbol in Projects

If you want to associate a color to a symbolic variable open Preferences task.

Preferences 

For more information, see the online learning platform

To create a symbol:

  1. From the menu, click Project Preferences.
  2. Click Add Entry. Clear All to delete all Symbols. 
  3. Put the Symbol name. 
  4. Click on color bar and choose a color (Basic or Custom colors). 
  5. Click Save

Example: Symbols NOK and KO. 


Japanese

プロジェクト


DATAmaestro では、プロジェクトは中央のテーマであり、すべてのデータマイニングおよび分析作業が実行されます。

つまり、プロジェクトは定義するタスクリストであると言えます。タスクは「親子関係」で動的に関連付けられます。つまり、1 つのタスクが更新されると、すべての依存タスクも変更されます。親タスクからの出力は子タスクの入力として使用できます。

タスクの例:

  • オブジェクトセットと属性セットの定義
  • 機能属性の定義 
  • グラフ視覚化
  • モデリング方法

たとえば、MySet101 というオブジェクトセットでヒストグラムを作成し、一部の外れ値オブジェクトを削除してこのセットを変更すると、プロジェクト監視センサーは、このオブジェクトセットのすべての依存タスクを更新する必要があることを検出します。もう一度ヒストグラムを表示すると、更新されていることを確認できます。

タスクのワークフローは最新で一貫性があります。これは、タスクマネージャーが「古い」タスクをただちに更新して、すべての出力を最新の状態に維持するためです。プロジェクトは常に最新の状態です。

追加のプロジェクトをすばやく作成することもできます。データ処理テンプレートを定義し、別のデータソースに適用するだけです。新しいデータソースをアップロードするだけで、すべての子 (および孫) タスクが自動的に更新されます。

命名規約

1 つのプロジェクトのタスクを再利用する場合は、今後のプロジェクトにとってわかりやすい命名規約を使用することを検討できます。たとえば、「Hydro<100」といった汎用的なタイトルをオブジェクトセットに付けると効果的な場合があります。


DATAmaestro analytics は「ワークスペース」と「プロジェクト」で構成されています。「ワークスペース」は「プロジェクト」が格納されたフォルダーです。「プロジェクト」はデータ分析ファイルです。  


すべてのワークスペースはすでに PEPITe によって作成されています。ユーザーには 1 つ以上のワークスペースへのアクセス権が付与されることがあります。

ワークスペースの操作

メインワークスペースページから直接ワークスペースをエクスポートする

  1. エクスポートするワークスペースを選択します。 
  2. メインメニューで [ワークスペースのエクスポート] をクリックします。ワークスペースは .zip ファイルでダウンロードされます。 

Image Modified


メインワークスペースページから直接ワークスペースをインポートする 

  1. メインメニューで [ワークスペースのインポート] をクリックします。
  2. コンピューターでファイル (.zip ファイル) を選択します。 
  3. ワークスペースを選択します。ワークスペースが選択されていない場合は、インポート先ワークスペースが zip ファイル名に対応します。 
  4. [アップロード] をクリックします。 


DATAmaestro Analytics プロジェクトからワークスペースをエクスポートする

Analytics プロジェクトではエクスポートされたワークスペースが最新のアクティブな (プロジェクトをホストする) ワークスペースであるため、他のワークスペースを選択できません。この点がメインワークスペースからのエクスポートとの違いです。 

  1. メニューで [プロジェクト]  [ワークスペースのエクスポート] をクリックします。
  2. ワークスペースは .zip ファイルでダウンロードされ、この特定のワークスペースのすべてのプロジェクトが含まれています。この例では「training」です。 

Image Modified


DATAmaestro Analytics プロジェクトからワークスペースをインポートする 

  1. メニューで [プロジェクト]  [ワークスペースのインポート] をクリックします。
  2. コンピューターでファイル (.zip ファイル) を選択します。 
  3. ワークスペースを選択します。ワークスペースが選択されていない場合は、インポート先ワークスペースが zip ファイル名に対応します。 
  4. [アップロード] をクリックします。 

Image Modified


プロジェクトの操作

クイックスタート」の説明に従い、いつでも最初からプロジェクトを作成できます。ただし、1 つのプロジェクトを作成した後は、そのプロジェクトのコピーを作成し、新しいプロジェクトに合わせて修正した方が効率的な場合もあります。

プロジェクトではデータが重要です。プロジェクトを実行するには、CSV または Excel ファイルをアップロードするか、データソースでは DATAserver 接続を使用します。一般的に、データヒストリアンのデータが使用されますが、すべてのデータベースファイルを使用できます。詳細については、データを参照してください。

新しいプロジェクトの作成

  1. メニューで [プロジェクト]  [新しいプロジェクト] をクリックします。
  2. [プロジェクトの作成] ウィンドウで [ワークスペース] を選択します。
  3. 新しいプロジェクトの名前を入力します。
  4. [作成] をクリックします。

既存のプロジェクトを開く

  1. メニューで [プロジェクト]  [プロジェクトを開く] をクリックします。
  2. リストからプロジェクトを選択します。 

複数のプロジェクトの表示

一度に複数のプロジェクトを表示する場合は、ブラウザーで別の DATAmaestro セッションを開きます。

プロジェクトの削除 

  1. 削除するプロジェクトを開きます。
  2. メニューで [プロジェクト]  [プロジェクトの削除] をクリックします。
  3. [OK] をクリックして確認します。 

プロジェクトのコピーの作成 

  1. コピーするプロジェクトを開きます。
  2. メニューで [プロジェクト]  [プロジェクトのコピーを作成] をクリックします。
  3. 名前を入力します。
  4. [要素] でコピーする要素を選択します。[すべてコピー] または [コピーする要素を選択] を選べます。選択できる要素は次のとおりです。データ、分類器値、機能属性、オブジェクトセット、属性セット、視覚化、モデル、その他。括弧内には、各要素の数に関する情報が表示されます。 

プロジェクトのエクスポート 

  1. コピーするプロジェクトを開きます。
  2. メニューで [プロジェクト]  [プロジェクトのエクスポート] をクリックします。
  3. [プロジェクトのみ] をクリックすると、プロジェクトのみがエクスポートされ、データセットは含まれません。[プロジェクトとデータをエクスポート] をクリックすると、プロジェクトとデータセットがエクスポートされます。 
  4. プロジェクトは .zip ファイルでダウンロードされます。 


メインワークスペースページから直接プロジェクトをインポートする 

  1. メインメニューで [ワークスペースのインポート] をクリックします。ボタン名は [ワークスペースのインポート] となっていますが、1 つのプロジェクトをインポートすることもできます。 
  2. コンピューターでファイル (.zip ファイル) を選択します。 
  3. ワークスペースを選択します。ワークスペースが選択されていない場合は、インポート先ワークスペースが zip ファイル名に対応します。 
  4. [アップロード] をクリックします。 

DATAmaestro Analytics プロジェクトからプロジェクトをインポートする 

  1. メニューで [プロジェクト]  [ワークスペースのインポート] をクリックします。ボタン名は [ワークスペースのインポート] となっていますが、1 つのプロジェクトをインポートすることもできます。 
  2. コンピューターでファイル (.zip ファイル) を選択します。 
  3. ワークスペースを選択します。ワークスペースが選択されていない場合は、インポート先ワークスペースが zip ファイル名に対応します。 
  4. [アップロード] をクリックします。 


プロジェクトで色と記号を関連付ける

色を記号属性に関連付ける場合は、[設定] タスクを開きます。

設定 


記号の作成

  1. メニューで [プロジェクト]  [設定] をクリックします。
  2. [エントリの追加] をクリックします。[すべて消去] をクリックすると、すべての記号が削除されます。 
  3. 記号名を入力します。 
  4. カラーバーをクリックし、色 (基本色またはカスタム色) を選択します。 
  5. [保存] をクリックします。 

例: 記号 NOK および KO。